
A stone retaining wall can transform any landscape, providing both functionality and timeless beauty. Whether you want to manage soil erosion, create garden terraces, or define outdoor spaces, the craftsmanship behind building a stone retaining wall plays a vital role. Let’s discuss how to build one step by step and what techniques help maintain a natural aesthetic that blends seamlessly with the environment.
Understanding Stone Retaining Walls
Stone retaining walls are designed to hold back soil and prevent erosion while enhancing the visual appeal of outdoor spaces. Unlike concrete or timber walls, stone walls offer a natural look that ages gracefully over time. They can be dry-stacked (without mortar) for a rustic feel or mortared for added strength and structure.
A well-built stone wall doesn’t just serve a purpose—it tells a story of craftsmanship, patience, and connection to the natural landscape.
Choosing the Right Stone
Selecting the right type of stone is the foundation of your project. The texture, color, and shape determine both strength and appearance.
Common Options Include:
- Fieldstone: Naturally weathered, irregular stones that give a rustic charm.
- Limestone: Easy to shape and cut; perfect for formal garden walls.
- Sandstone: Offers warm tones and blends beautifully with plants.
- Granite: Durable and strong, ideal for long-lasting structures.
- Slate: Thin and flat stones great for layered wall designs.
When choosing stones, ensure they complement the surroundings. For a truly natural aesthetic, try to source local stones—this helps your wall look like it belongs in the landscape rather than being placed on top of it.
Planning the Layout
Before lifting a single stone, careful planning ensures stability and balance. Begin by marking the wall’s location using stakes and string lines to visualize the final layout. Consider both functionality and aesthetics:
- Wall height: Most residential retaining walls are under 4 feet. Taller ones may require engineering support.
- Drainage: Water buildup behind the wall can cause pressure and eventual collapse. Incorporate proper drainage systems.
- Backfill: Gravel and compacted soil improve stability.
- Slope: Slightly tilt (or “batter”) the wall backward toward the soil to enhance support.
A well-thought-out design balances visual harmony with structural integrity.
For homeowners in the area, rainierrockeries.com provides expert services in building durable and visually appealing retaining walls. Their team specializes in creating functional landscapes with retaining walls in Kent, WA, that seamlessly blend with natural surroundings.
Excavation and Foundation
The strength of a retaining wall starts underground. Begin by digging a trench about one-tenth the height of the planned wall, plus 4–6 inches for the base layer. For instance, if your wall is 3 feet high, dig about 8 inches deep.
- Level the trench base using a hand tamper or plate compactor.
- Add a gravel base layer (typically 4–6 inches thick) to improve drainage and support.
- Compact the gravel thoroughly to prevent settling later.
A solid foundation ensures the wall stands firm for decades without shifting or leaning.
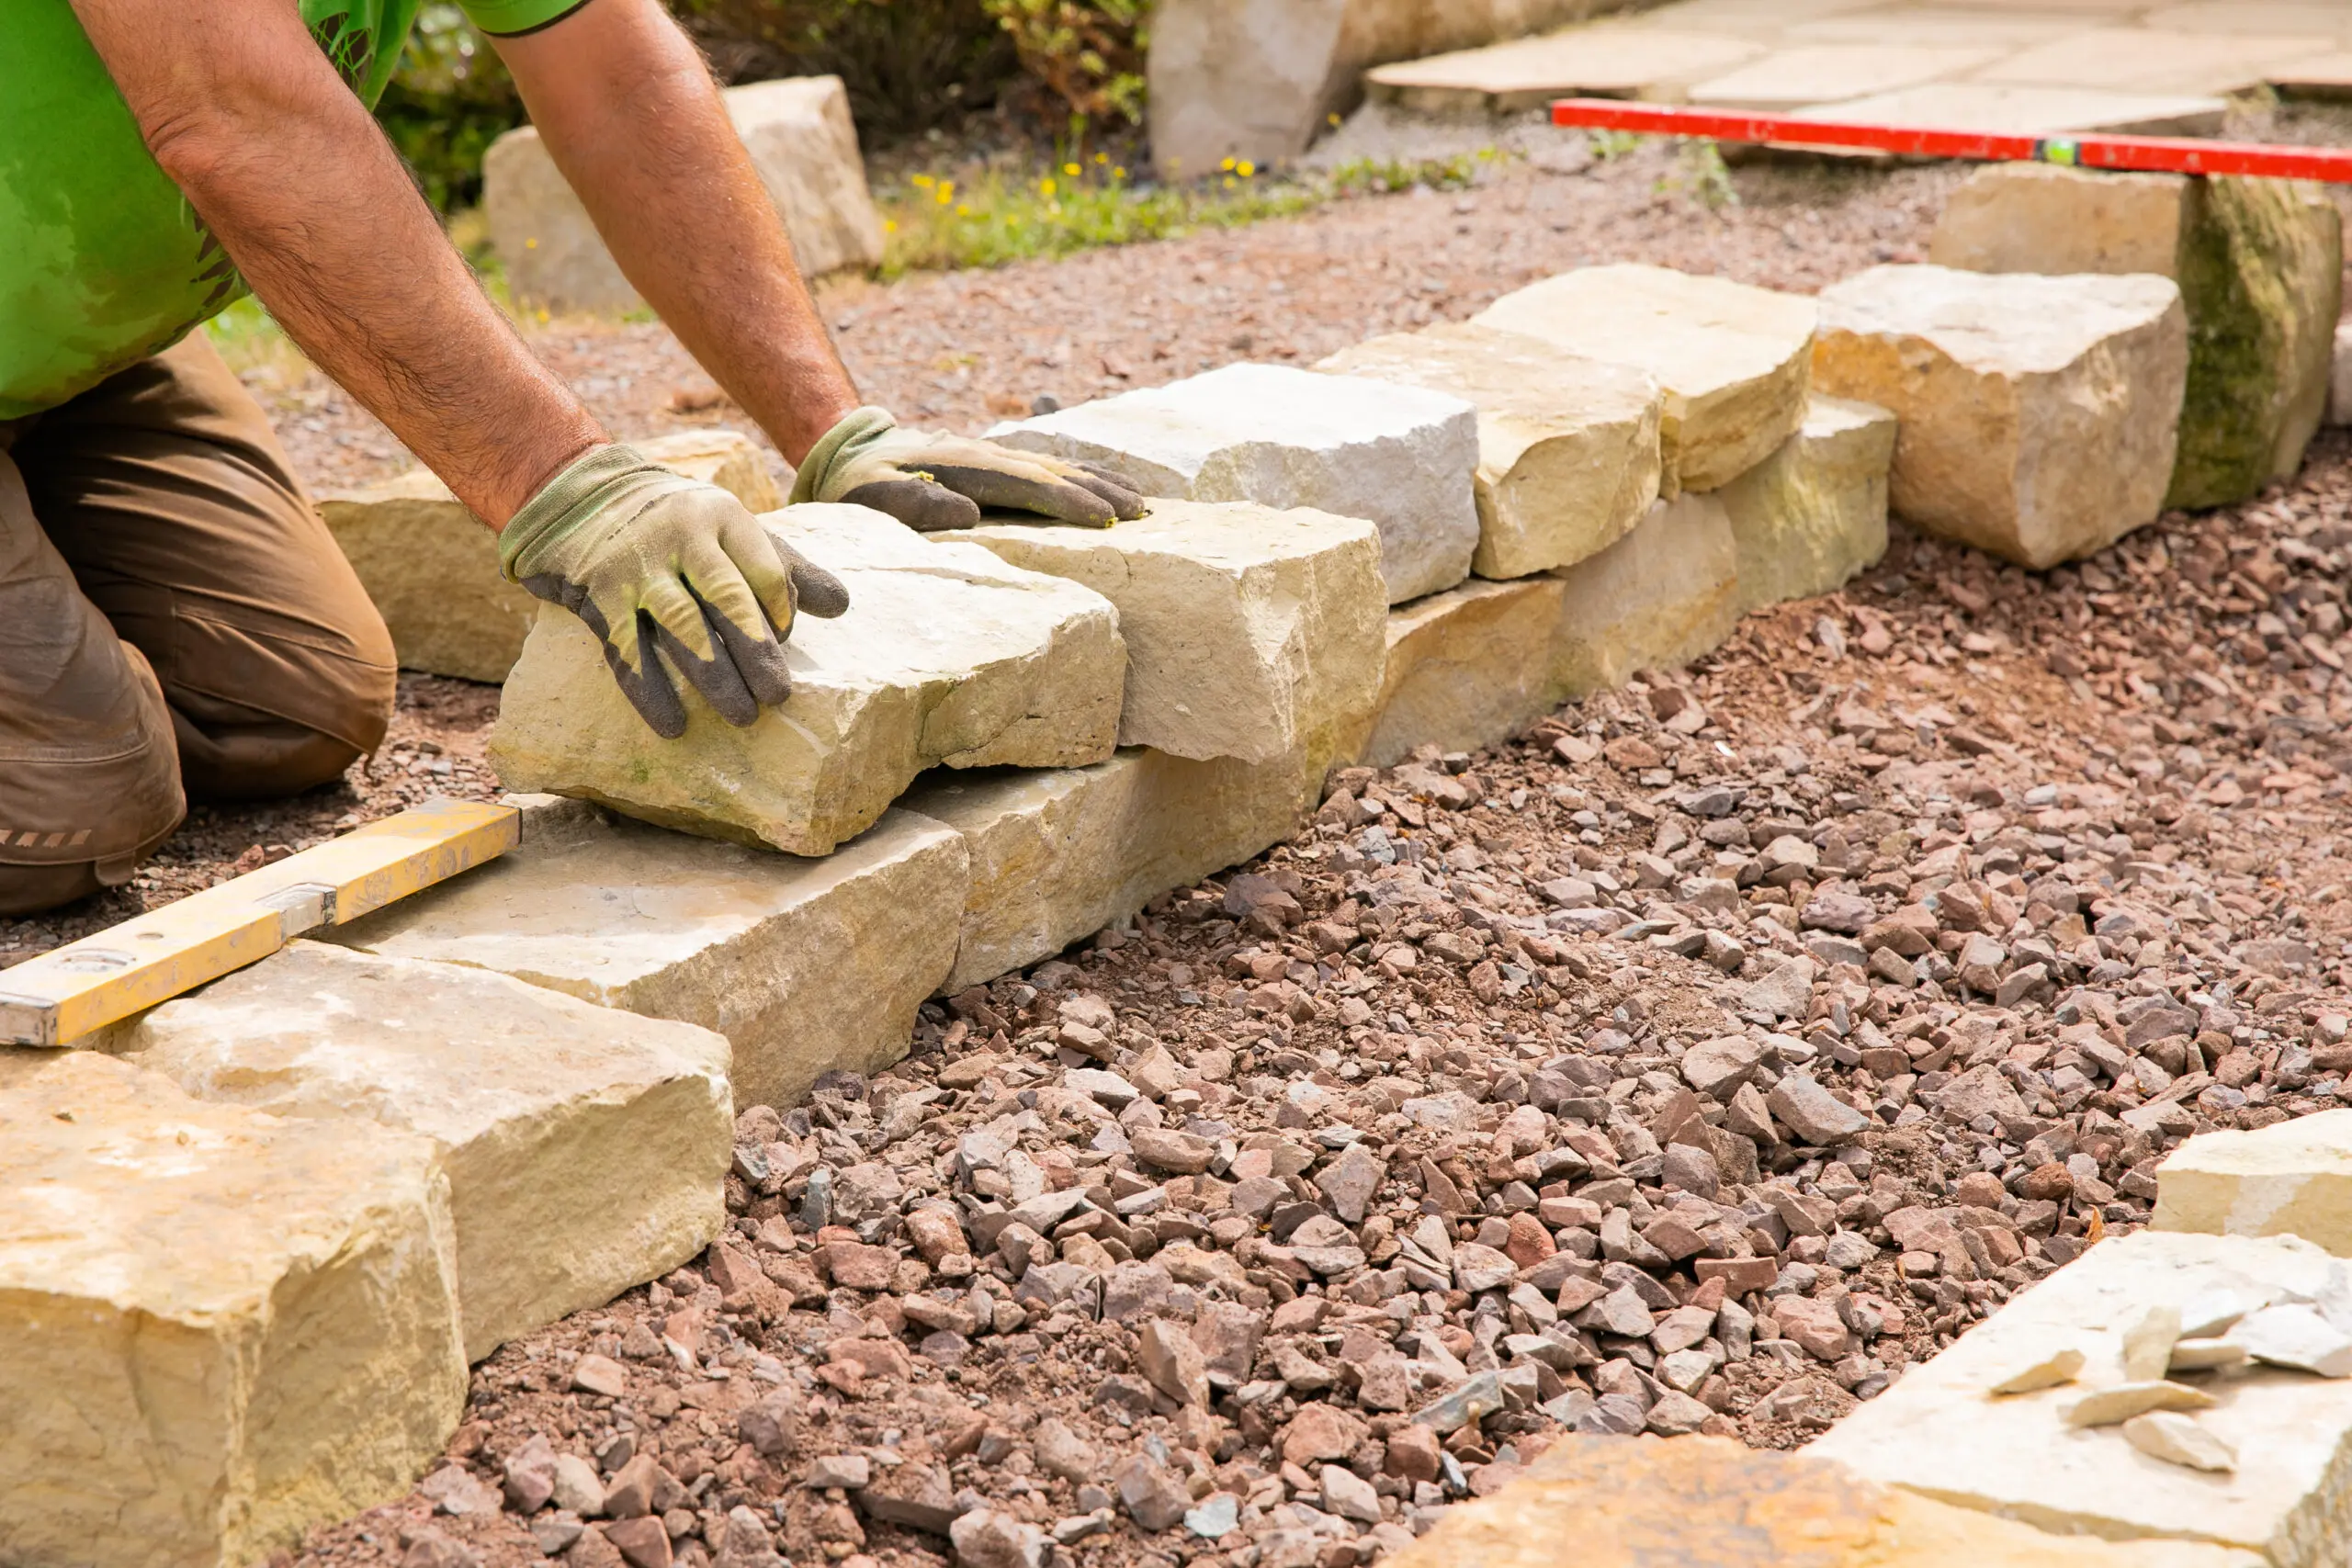
Laying the First Course
The first row (or “course”) of stones is the most crucial—it sets the tone for the entire wall. Use the largest and flattest stones at the base.
- Start at one end and work toward the other, maintaining level alignment.
- Use a carpenter’s level frequently to check horizontal and vertical balance.
- Position each stone firmly into the gravel base, tapping lightly with a rubber mallet.
This foundational layer must be as stable and even as possible, as any unevenness will magnify in higher layers.
Building the Wall
Now that the base is set, continue laying stones in successive rows.
1. Stagger the Joints
Avoid vertical seams lining up between rows. Staggering helps distribute weight evenly and improves wall strength. Think of it as weaving the wall together like a puzzle.
2. Use the “One Over Two” Rule
Each stone should cover the joints of two stones below it, enhancing interlocking and reducing weak points.
3. Fill Gaps Strategically
Small stones or “chinking stones” can fill gaps between larger ones. They stabilize the structure and contribute to a natural, seamless appearance.
4. Step Back Gradually
Tilt the wall slightly backward (about 1 inch per foot of height) toward the soil. This angle, called “batter,” increases pressure resistance and stability.
5. Integrate Drainage
Behind the wall, add a layer of landscape fabric and 12–18 inches of gravel. You can also install a perforated drain pipe (French drain) to channel water away from the base.
6. Backfill Regularly
As you build, add compacted soil or gravel behind the wall in layers. This reduces voids and keeps the structure secure.
Finishing the Top Layer
The top layer (or capstones) gives the wall a polished and stable finish. Choose large, flat stones that slightly overhang the wall edges for a neat appearance. Mortar can be applied under these capstones for additional stability, even in dry-stacked designs.
Capstones serve both decorative and protective purposes—they shield the wall from direct rainfall and soil erosion.
Achieving a Natural Aesthetic
While functionality is key, achieving a natural aesthetic elevates your stone wall from practical to artful. Here’s how:
- Blend shapes and sizes: Mix irregular and flat stones for visual texture.
- Vary colors subtly: Use stones from the same region but with slight variations for depth.
- Incorporate greenery: Add creeping plants or moss between stones to soften hard lines.
- Follow the land’s contours: Let the wall flow with the terrain instead of forcing straight lines.
- Avoid over-polishing: Rough textures look more organic and timeless than perfectly smooth finishes.
The beauty of natural stone lies in its imperfections. Each piece adds character, making your wall look like it’s always been part of the landscape.
Maintenance Tips
A well-constructed stone retaining wall requires minimal maintenance, but occasional checks can extend its lifespan.
- Inspect annually for loose stones or cracks.
- Clear drainage paths to prevent water buildup.
- Remove weeds and roots that may shift stones over time.
- Reposition displaced stones promptly before minor shifts worsen.
- Monitor soil pressure after heavy rains or frost seasons.
With regular care, a stone retaining wall can last a lifetime—sometimes even centuries.
Common Mistakes to Avoid
Even experienced builders can run into issues if attention to detail slips. Here are common pitfalls:
- Skipping the gravel base or compaction step.
- Ignoring drainage solutions.
- Building walls too tall without proper engineering.
- Using small, lightweight stones for the bottom layer.
- Aligning vertical seams between rows.
Avoiding these mistakes ensures your retaining wall remains strong, stable, and beautiful for years to come.
The Beauty of Craftsmanship
Building a stone retaining wall isn’t just a construction project—it’s an act of craftsmanship. Each stone placement requires intuition, precision, and patience. Unlike uniform concrete blocks, natural stones demand that you “read” their shapes and fit them together like a puzzle. This hands-on process connects you directly to the landscape, creating something uniquely yours.
Final Thoughts
A stone retaining wall offers more than soil support—it enhances your outdoor living space with lasting elegance. From the first shovel of gravel to the final capstone, every step requires careful planning and artistry. When done right, the result is a durable structure that looks as if it naturally grew out of the earth itself.
Whether you’re building a garden terrace, a pathway border, or an erosion barrier, the key techniques in stone selection, layout, drainage, and finishing will define the success of your project. Take your time, trust your eye for balance, and let nature guide your design. The reward is a retaining wall that stands the test of time—both in strength and beauty.

