
The mortar with which the ceramic is fixed is very elastic and very adherent. This adhesive should be chosen based on several factors:
Learn about Ceramics distributor by checking out the site peppaland.com.
- The type of ceramic to be glued.
- The place where it will be installed (indoors or outdoors).
- The climate to which the product will be exposed.
The typology of these adhesives is governed by common guidelines in order to facilitate their choice. It is based on the following values: adhesion, grip, slip and open time. For each of these values, there are different classes according to their characteristics (normal adhesive, improved, fast setting, low slip). Make a visit to https://www.kinginstallation.com/ for the best result.
Spread the jointing cement on the already leveled surface
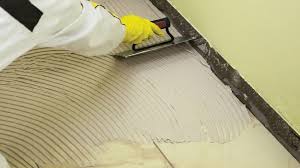
We prepare the mixture according to the manufacturer’s instructions. Once the right texture is obtained, and always following the main line established, we spread the jointing cement on the already compacted and leveled surface.
Distribute the cement on the ceramic piece
We are going to spread the cement on the ceramic part so as to generate a double gluing, both on the support and on the part. Make sure that the cement layer is uniform and is of the same thickness on both sides. To do this, we will use a notched trowel with a tooth size of 10mm, and we will distribute the adhesive perpendicular to the long side of the part so that the air that might be left below can escape.
Installation of the parts
Once the back of the part has been glued with the jointing cement, we will fix it on the surface that we have previously traced with the same cement, and always following the main traced line.
To install the part, we tap gently with the soft rubber mass and thus we eliminate any air bubbles produced in the mortar. The other parts are placed taking into account that a minimum joint of 2 mm must be maintained between them. This distance can be maintained with the help of separation braces.
- For rectified floors and walls, we recommend the use of leveling systems for laying ceramic tile coverings has become widespread in recent years. Its use brings great advantages to the final quality of the coating. However, they require an investment, both in hardware and in installation time. You can search for custom tile installation omaha ne services to get help with your walls and floors.
- Today there is a wide range of manufacturers and types of leveling systems on the market, each with its own peculiarities. In general, there are two types of leveling systems: wedge systems, in which the pressure to level is exerted parallel to the surface of the tile with a clamp; and bell systems, in which pressure is exerted perpendicular to the tile with a clamp or a manual threading system.
It is important to remember that the implementation of the clamping and leveling system does not exclude the further inclusion of the spider. This system does not replace, but complete.
How to correctly position the recommended support?
- First of all, once the thin-set mortar is spread, it is necessary to place the supports under the pieces on the 4 sides. For large rooms, more supports should be used per side.
- Lay the tile and strike with the rubber hammer.
- Next, insert the shims into the housing, pressing them down without exceeding the breaking point. To make it easier, we recommend using the adjustable traction clamp.
- Once the mortar has set, just tap the support with the rubber mass or the end of the foot in the direction of the joint to remove it.

